Warning
This document is for an old release of Galaxy. You can alternatively view this page in the latest release if it exists or view the top of the latest release's documentation.
Galaxy Interactive Environments
A GIE is a Docker container, launched by Galaxy, proxied by Galaxy, with some extra sugar inside the container to allow users to interact easily with their Galaxy histories.
How GIEs Work
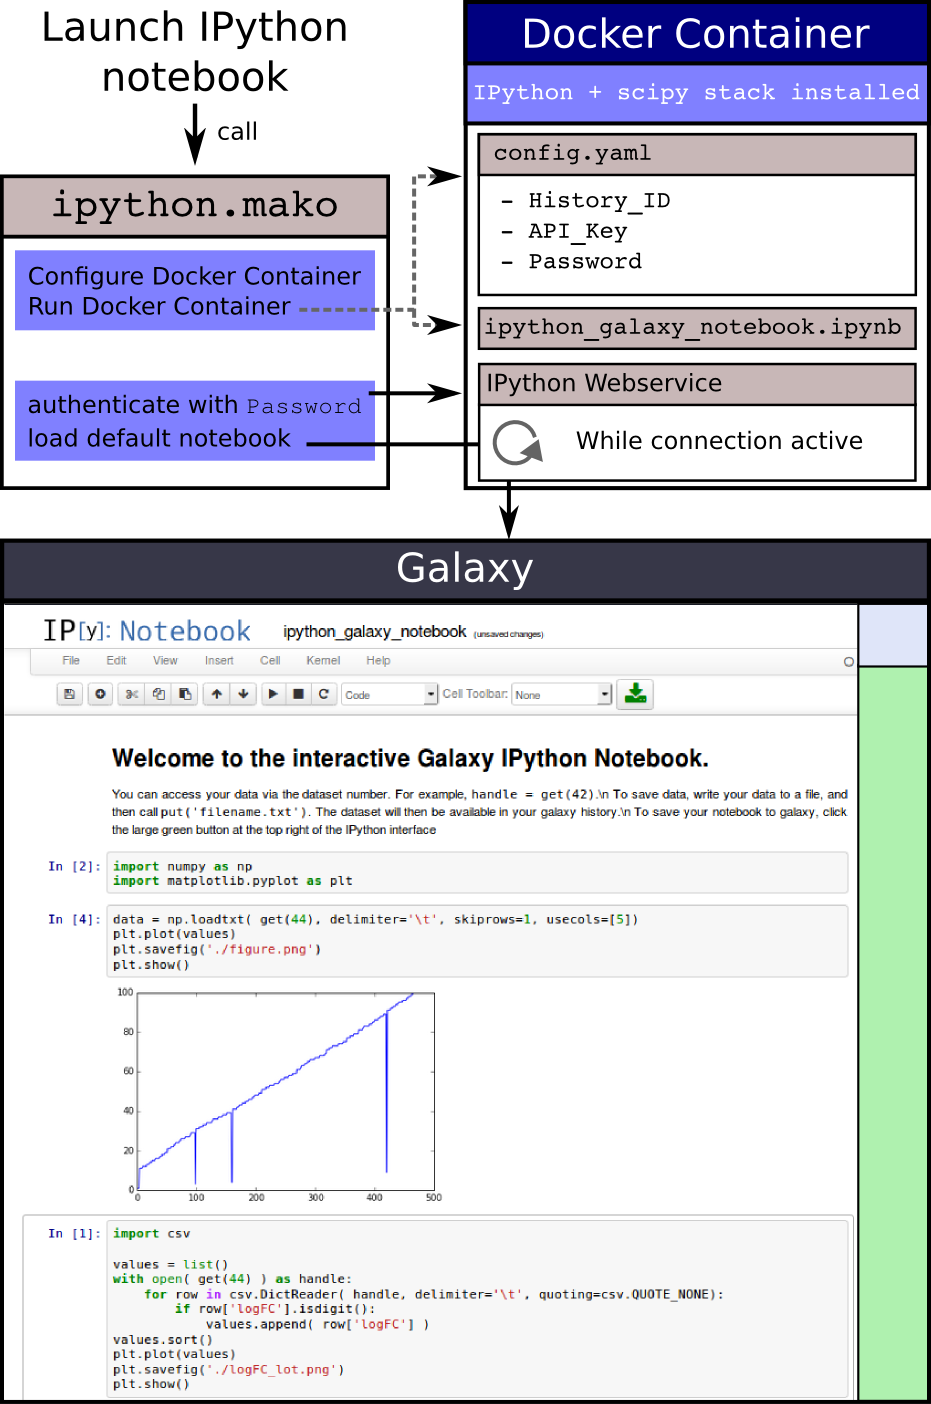
A GIE is primarily composed of a Docker container, and the Galaxy visualization component. Galaxy visualization plugins are rendered using Mako templates and Mako templates in turn can run Python code. GIEs build upon visualization plugins, adding features to allow for container management and proxying. This Python code in the Mako templates is used to launch the Docker container within which a GIE runs. Once this container is launched, we notify a proxy built into Galaxy which helps coordinate a 1:1 mapping of users and their docker containers.
Here’s a simple diagram recapping the above:
Deploying GIEs
Deploying GIEs is not a trivial operation. They have complex interactions with numerous services, you’ll need to be a fairly competent SysAdmin to debug all of the possible problems that can occur during deployment. After the initial hurdle, most find that GIEs require little to no maintenance.
An Ansible role for installing and managing GIEs can be found on Github and Ansible Galaxy.
Setting up the Proxy
The Galaxy IE Proxy is a NodeJS+Sqlite3 application. The NodeJS that is installed by default into the Galaxy Virtualenv is suitable for an execution environment for the Galaxy IE Proxy.
Note that if you have NodeJS installed under Ubuntu, it often installs to
/usr/bin/nodejs, whereasnpmexpects it to be/usr/bin/node. You may need to create that symlink yourself.
Once Node and npm are ready to go, you’ll need to install the dependencies
$ cd $GALAXY_ROOT/lib/galaxy/web/proxy/js
$ npm install
Running node lib/main.js --help should produce some useful help text
Usage: main [options]

Options:

-h, --help             output usage information
-V, --version          output the version number
--ip <n>               Public-facing IP of the proxy
--port <n>             Public-facing port of the proxy
--cookie <cookiename>  Cookie proving authentication
--sessions <file>      Routes file to monitor
--verbose
There are two ways to handle actually running the proxy. The first is to have
Galaxy automatically launches the proxy as needed. This is the default configuration
as of 2014. Alternately, the proxy can be stated manually or via a system such as
Supervisord. Assuming that the $GALAXY_ROOT environment variable refers to the location of
the Galaxy installation, the command for launching the proxy is:
$ node $GALAXY_ROOT/lib/galaxy/web/proxy/js/lib/main.js --ip 0.0.0.0 \
    --port 8800 --sessions $GALAXY_ROOT/database/session_map.sqlite \
    --cookie galaxysession --verbose
And this can be configured in your supervisord config by adding:
[program:galaxy_nodejs_proxy]
directory       = GALAXY_ROOT
command         = GALAXY_ROOT/lib/galaxy/web/proxy/js/lib/main.js --sessions database/session_map.sqlite --ip 0.0.0.0 --port 8800
autostart       = true
autorestart     = unexpected
user            = GALAXY_USER
startsecs       = 5
redirect_stderr = true
where GALAXY_ROOT is the location of your Galaxy installation and GALAXY_USER is the username of the user that
Galaxy runs as.
Configuring the Proxy
Configuration is all managed in galaxy.yml. The default arguments used
for the proxy are:
dynamic_proxy_manage: true
dynamic_proxy_session_map: database/session_map.sqlite
dynamic_proxy_bind_port: 8800
dynamic_proxy_bind_ip: 0.0.0.0
dynamic_proxy_debug: true
As you can see most of these variables map directly to the command line arguments to the NodeJS script. There are a few extra parameters which will be needed if you run Galaxy behind an upstream proxy like nginx or Apache:
dynamic_proxy_external_proxy: true
dynamic_proxy_prefix: gie_proxy
The first option says that you have Galaxy and the Galaxy NodeJS proxy wrapped in an upstream proxy like Apache or NGINX. This will cause Galaxy to connect users to the same port as Galaxy is being served on (so 80/443), rather than directing them to port 8800.
The second option is closely entertwined with the first option. When Galaxy is
accessed, it sets a cookie called galaxysession. This cookie generally cannot be sent with requests
to different domains and different ports, so Galaxy and the dynamic proxy must
be accessible on the same port and protocol. In addition, the cookie is only
accessible to URLs that share the same prefix as the Galaxy URL. For example,
if you’re running Galaxy under a URL like https://f.q.d.n/galaxy/, the cookie
is only accessible to URLs that look like https://f.q.d.n/galaxy/*. The
second (dynamic_proxy_prefix) option sets the URL path that’s used to
differentiate requests that should go through the proxy to those that should go
to Galaxy. You will need to add special upstream proxy configuration to handle
this, and you’ll need to use the same dynamic_proxy_prefix in your
galaxy.yml that you use in your URL routes.
In the examples below, we assume that your Galaxy installation is available
at a URL such as https://f.q.d.n/galaxy. If instead it is available at a
URL like https://f.q.d.n, remove the /galaxy prefix from the examples.
For example /galaxy/gie_proxy would become /gie_proxy. Remember that
gie_proxy is the value you use for the dynamic_proxy_prefix option. If
you use a different value in that option you should change the examples
accordingly.
Apache
# Project Jupyter specific. Other IEs may require their own routes.
ProxyPass        /galaxy/gie_proxy/jupyter/ipython/api/kernels ws://localhost:8800/galaxy/gie_proxy/jupyter/ipython/api/kernels

# Global GIE configuration
ProxyPass        /galaxy/gie_proxy http://localhost:8800/galaxy/gie_proxy
ProxyPassReverse /galaxy/gie_proxy http://localhost:8800/galaxy/gie_proxy

# Normal Galaxy configuration
ProxyPass        /galaxy http://localhost:8000/galaxy
ProxyPassReverse /galaxy http://localhost:8000/galaxy
Please note you will need to be using apache2.4 with mod_proxy_wstunnel.
Nginx
# Global GIE configuration
location /galaxy/gie_proxy {
    proxy_pass http://localhost:8800/galaxy/gie_proxy;
    proxy_redirect off;
}

# Project Jupyter specific. Other IEs may require their own routes.
location ~ ^/galaxy/gie_proxy/jupyter/(?<nbtype>[^/]+)/api/kernels(?<rest>.*?)$ {
    proxy_pass http://localhost:8800/galaxy/gie_proxy/jupyter/$nbtype/api/kernels$rest;
    proxy_redirect off;
    proxy_http_version 1.1;
    proxy_set_header Upgrade $http_upgrade;
    proxy_set_header Connection "upgrade";
}
If you proxy static content, you may find the following rule useful for proxying to GIE and other visualization plugin static content.
location ~ ^/static/plugins/(?<plug_type>.+?)/(?<vis_name>.+?)/static/(?<static_file>.*?)$ {
    alias /path/to/galaxy-dist/config/plugins/$plug_type/$vis_name/static/$static_file;
}
Docker on Another Host
You might want to run your IEs on a host different to the one that hosts your Galaxy webserver, since IEs on the same host as the webserver compete for resources with that webserver and introduce some security considerations which could be mitigated by moving containers to a separate host. This feature has been available since 15.07 and is used in production at the University of Freiburg and on usegalaxy.org.
First you need to configure a second host to be Docker enabled. In the
following we call this host gx-docker You need to start the Docker daemon
and bind it to a TCP port, not to a Unix socket as is the default. For example
you can start the daemon with
$ docker -H 0.0.0.0:4243 -d
On your client, the Galaxy webserver, you can now install a Docker client. This
can also be done on older systems like Scientific-Linux, CentOS 6, which do not
have Docker support by default. The client just talks to the Docker daemon on
host gx-docker, and does not run anything itself, locally. You can test
your configuration for example by starting busybox from your client on the
Docker host with
$ docker -H tcp://gx-docker:4243 run -it busybox sh
So far so good! Note, however, that unless restricted by a firewall, this mode
of operation is insecure, as any client could connect and run containers on
gx-docker. If this is a concern at your site, follow the instructions in
the Docker documentation to Protect the Docker daemon socket.
Now we need to configure Galaxy to use our new Docker host
to start the Interactive Environments. For that we need to edit the Jupyter GIE
configuration, jupyter.ini to use our custom docker host
[main]

[docker]
command = docker -H tcp://gx-docker:4243 {docker_args}
docker_hostname = gx-docker
Please adapt your command as needed.
The Jupyter GIE supports getting and fetching Galaxy history datasets entirely
through the Galaxy API so it is not necessary to share a filesystem with
gx-docker. However, other GIE plugins may still require this.
For those GIE plugins, we need to configure a share mount point between the Docker host and Galaxy. Unfortunately, this can not be a NFS mount. Docker does not like NFS yet. You could for example use a sshfs mount with the following script
if mount | grep ^gx-docker:/var/tmp/gx-docker; then
    echo "/var/tmp/gx-docker already mounted."
else
    sshfs gx-docker:/var/tmp/gx-docker /var/tmp/gx-docker
    echo 'Mounting ...'
fi
This will let Galaxy and the Docker host share temporary files.
Docker Engine Swarm Mode
As of Docker Engine version 1.12, Docker Engine can be configured to provide a cluster of Docker Engines in a configuration known as Docker Engine swarm mode. This replaces the previous and similarly named Docker Swarm clustering solution, which is not compatible with swarm mode.
The Docker Engine swarm mode documentation fully explains the differences, but
the major difference is that whereas under Docker Swarm one could run commands
on the swarm with docker run, Docker Engine swarm mode requires one to
create persistent services with docker service create and to remove those
services once no longer in use with docker service rm.
Galaxy supports both Docker Engine swarm mode and the legacy Docker Swarm
system. Legacy Docker Swarm is supported without any special configuration,
because the containers are still run with docker run as before. To support
Docker Engine swarm mode, additional configuration is required. Begin by
editing your GIE plugin’s ini configuration file (e.g. jupyter.ini) and set
the docker_connect_port in addition to any other
relevant options. Unless you are using a non-standard Docker image, the correct
value for docker_connect_port should be suggested to you in the sample
configuration file:
[docker]
docker_connect_port = 8888
Note that your Galaxy server does not need to be a member of the swarm itself. It can use the method outlined above in the Docker on Another Host section to connect as a client to a Docker daemon acting as a swarm mode manager.
Once configured, you should see that your GIE containers are started and run as
services, which you can inspect using the docker service ls command and
other docker service subcommands.